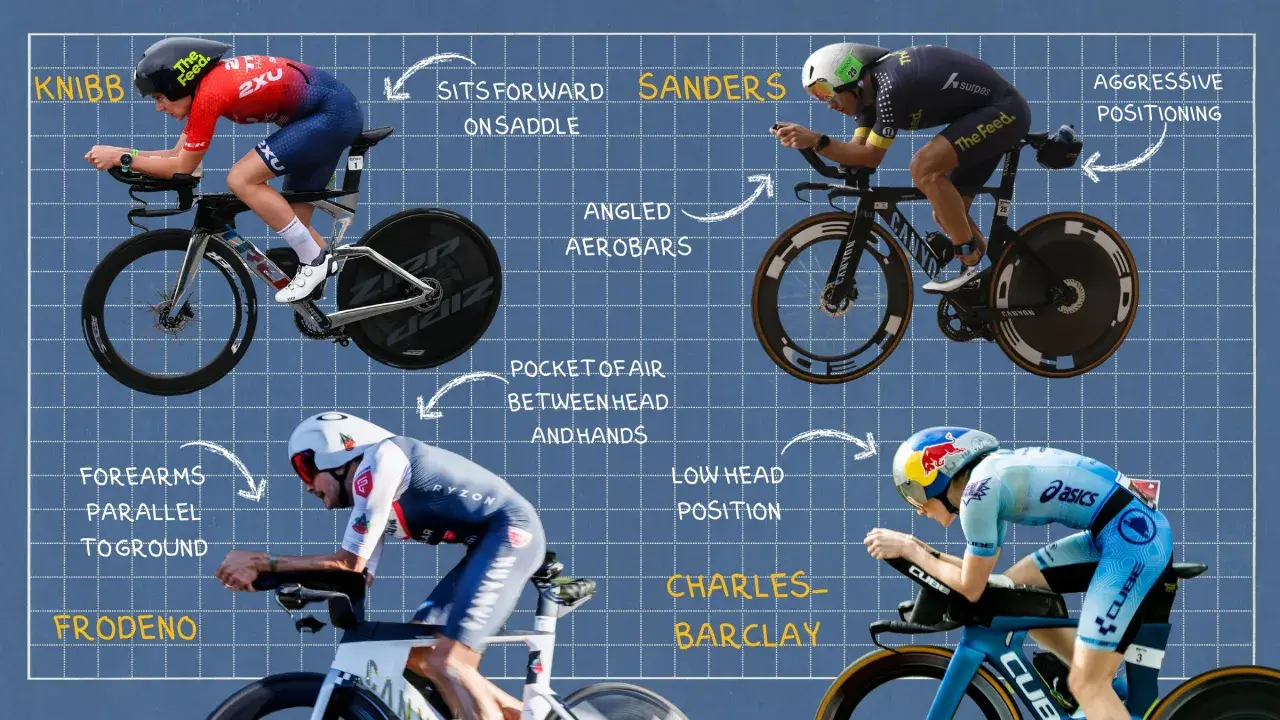
Good tri bike positioning is not about looking extreme; it is about finding the point where aerodynamics, power, and comfort all line up long enough for you to ride well and still run well afterwards. The best setups usually feel calm rather than dramatic: the pelvis is stable, the shoulders are supported, and the hip angle stays open enough to keep power on tap. In this article, I break down the parts of the position that matter most, how to adjust them in the right order, and the mistakes that quietly waste speed.
The position should save time without stealing your run
- Start with the saddle, because the rest of the fit depends on pelvic stability.
- Use the aero pads to support your upper body, not to hold yourself up with your shoulders.
- More aggressive is not always faster if it closes the hip and drops your power.
- For many age-group athletes, a slightly higher front end is more sustainable than a slammed setup.
- Make changes in small steps and test them under race-like effort, not only at easy pace.
- If pain, numbness, or handling issues appear, the setup needs rechecking, not just more adaptation.
What a fast tri position actually needs to do
The first mistake I see is treating the aero position as a shape instead of a function. A good tri setup has to reduce drag, but it also needs to let you produce repeatable power and keep your torso relaxed enough that you are not fighting the bike for every minute of the ride. If the position looks fast but collapses your hips, tenses your shoulders, or makes your head bob around, it is costing you more than it saves.
I like to think of tri positioning as a three-way compromise. Aerodynamics matter, but so does the run off the bike. Over-distance events punish positions that are too cramped because the fatigue compounds: hip closure affects power, low-back tension affects posture, and posture affects how cleanly you can run in transition. On the other hand, a position that is too open and upright gives away free speed in the wind.
The sweet spot is usually the position you can hold while breathing freely, keeping your shoulders quiet, and staying low enough that your torso is not acting like a sail. Once you accept that trade-off, the next question is where to start making the actual adjustments.
Set the saddle first because everything else depends on it
When I fit a tri bike, I start with the saddle before I touch the front end. That is not a habit for the sake of order; it is because saddle height, setback, and tilt decide how your pelvis sits, and that decides whether the cockpit can work at all. If the saddle is wrong, you will end up chasing comfort with stem changes that never solve the underlying problem.
Tri bikes usually run steeper than road bikes, with the rider rotated a little further forward to open the hip and support the aero posture. In practical terms, that often means a saddle placed more forward than a road setup, with a stable front-to-back balance and a tilt that does not force pressure onto soft tissue. A tri-specific or short-nose saddle is often useful here, especially if you spend a lot of time on the nose of the saddle in the extensions.
| Adjustment | What it should improve | Warning sign |
|---|---|---|
| Saddle height | Power delivery and hip stability | Rocking hips, toe-pointing, hamstring tension |
| Saddle fore-aft | Hip opening and sustainable aero posture | Feeling jammed, sliding forward, knee discomfort |
| Saddle tilt | Pressure relief and support on the sit bones | Numbness, excessive hand pressure, sliding |
| Cleat position | Foot stability and smooth pedalling | Hot spots, numb toes, unstable ankle motion |
If you want a simple checkpoint, look for a position where the pelvis feels anchored, the knees track cleanly, and you are not constantly readjusting on the saddle. British Cycling’s triathlon fit guidance uses a sensible starting approach here: begin conservative, then move carefully rather than chasing the most aggressive shape immediately. That is the right instinct, especially for riders training through a long season.
Once the saddle is stable, the front end becomes much easier to interpret, because the cockpit will finally reflect your real posture instead of compensating for a bad seat setup.

Use the cockpit to support, not force, your posture
The bars, pads, and extensions should hold you up in the aero position, not make you perch on your hands. I want the elbows supported on the pads, the shoulders relaxed, and the upper body low enough to be aerodynamic without forcing the neck into a strain you cannot sustain. A useful visual cue is that the forearms should feel like they are carrying some of the load, with the torso resting naturally rather than braced.
For many riders, the most useful front-end changes are stack and reach. More stack gives you a higher, more open position; more reach extends the body and can help create a stable, elongated aero shape if the rider has the mobility to hold it. The mistake is assuming lower is always faster. On modern tri bikes, I often see better results from a position that is a little higher and a little longer than the old “slam it flat” approach, because it gives the rider a more usable pocket to hide the head and keep breathing steady.
If you need a practical starting point, think in ranges rather than absolutes. Many age-group triathletes do well with an elbow-pad drop of roughly 8-10 cm below the saddle midpoint, while more aggressive setups can go further if the rider is strong, flexible, and comfortable in the position. For riders who struggle with handling or have back issues, keeping the pads level with or just below the saddle can be the smarter choice. The right answer is the one you can hold at race power, not the one that photographs best.
One small but important detail is bar tilt. A modest upward tilt at the extensions can support the upper body and reduce shoulder tension. It is not a magic trick, but it often turns a barely tolerable position into one that is genuinely repeatable over long efforts. From there, the next question is not just how the bike fits, but what kind of race you are trying to ride.
Match the position to the race and to your body
A sprint bike leg and an Ironman bike leg do not reward the same posture. Shorter races can justify a more aggressive setup because the time spent in position is limited, while longer events demand a little more forgiveness so you can keep the same shape after 60, 120, or 180 kilometres. I would rather see an athlete give away a touch of aero at the front end and finish strong than chase a race-day silhouette that unravels after the first hour.
| Race type | Position bias | Why it works | Common mistake |
|---|---|---|---|
| Sprint | Lower and more aggressive | High aero payoff over a short duration | Overdoing the drop and losing control |
| Olympic | Balanced but still fairly low | Enough speed to reward aerodynamics without full fatigue collapse | Copying a pro position that the rider cannot sustain |
| 70.3 | Slightly more supported | Preserves power and keeps the run more honest | Choosing wind-cheating posture over repeatability |
| Ironman | Comfortable aero with stable support | Reduces posture drift and protects the run | Staying too low for too long and paying for it late |
In the UK, I would be especially cautious about setting an overly low front end for the sake of appearance alone. Wet roads, rough surfaces, roundabouts, and variable wind all punish a position that is barely under control. If you race on exposed courses or spend a lot of time training outdoors in mixed conditions, a slightly more generous setup is often the better trade.
The same logic applies to rider type. A flexible, strong rider with a background in time trialling can usually tolerate more reach and drop than a newer triathlete, but that does not mean they should automatically use the most aggressive numbers available. The position still has to suit the body in front of you, and the run afterwards is part of the equation. Once that is clear, the final test is whether the position survives real training.
Test it on real rides, not just on the trainer
A position can feel fine in a static fit session and fail completely once you ride it under load. That is why I treat adaptation as part of the fit, not an afterthought. If you raise the saddle, change setback, or alter pad height, make the move in very small steps and give your body time to understand it. Two millimetres is a useful size of change. Ten millimetres is usually too much unless you already know your body tolerates it.
Once the adjustment is made, do not limit testing to easy spinning. Ride tempo, threshold, and race-specific blocks in the aero bars so you can tell whether the position still works when breathing hard and holding power. A steady interval set on a slight incline is particularly useful because it exposes hidden issues: if your neck tightens, your pelvis slides, or your shoulders rise as the effort builds, the setup is not yet right.
I also like to test outside, not only on the trainer. The trainer removes steering demands, road vibration, and a lot of the subtle movement that reveal whether the position is genuinely usable. If you only ever test indoors, you can miss the fact that your head drops, your hands tense, or your balance feels unstable once the bike is moving on real tarmac.
And if you are building toward a first race in the extensions, start with shorter blocks and extend them gradually. The goal is not to tolerate misery; it is to teach the body that the position is normal.
The mistakes that quietly ruin a good setup
Most bad tri positions fail for boring reasons, not dramatic ones. The bike is not necessarily the wrong size; the position is just assembled in a way that forces compensation somewhere else. The fastest way to waste months is to ignore the small warnings because the bike still looks aerodynamic from the side.
- Chasing a low front end before the saddle is right. If the pelvis is unstable, the cockpit will never feel clean.
- Too much reach too soon. Overreaching locks the shoulders, strains the neck, and reduces control.
- Ignoring saddle pressure. Numbness usually means the pelvis is not being supported properly, not that you need to “get used to it”.
- Changing too many variables at once. If you move saddle height, setback, and pad stack together, you will not know what actually helped.
- Forgetting the cleats. A twisted or poorly placed cleat can create pain that looks like a bike-fit problem higher up the chain.
- Testing only at easy pace. A position that works in zone 2 can fall apart at race intensity.
Keep the position current as your body and season change
The position that felt right in early season may not be right six months later. Body composition shifts, flexibility changes, new shoes alter cleat alignment, and longer race blocks can expose limits that were invisible in the off-season. I would recheck the setup after major weight changes, after a new saddle or crank change, and any time you start feeling persistent numbness, hip tightness, or neck fatigue.
If you make tri bike positioning a living part of your training rather than a one-time adjustment, you will usually get more out of it. That means checking it again after the first few long rides, again after a block of race-pace work, and again before a key event if the course or distance is different from what you have been preparing for. Small rechecks are much cheaper than rebuilding the whole position after it has drifted off course.
The best setups are rarely the most dramatic ones. They are the ones you can hold on a windy day, on rough roads, and deep into the ride without losing shape. If you keep the saddle stable, the cockpit supportive, and the position honest under effort, you will usually end up with more speed than any extreme setup can promise. That is the standard I would use before race day, and it is the standard I would keep using as the season unfolds.
